304 North Cardinal St. Dorchester Center, MA 02124
Exploring the World of Insect Macro Photography: Techniques and Tips
Insect macro photography opens a fascinating window into the natural world, allowing photographers to capture the intricate beauty and fine details of some of the smallest creatures on the planet. From the delicate wings of a butterfly to the mesmerizing compound eyes of a dragonfly, insects offer endless possibilities for creative expression. However, photographing them up close presents its own set of challenges, requiring patience, technique, and the right gear.
This guide delves deep into the world of insect macro photography tips, covering everything from preparation and essential equipment to advanced techniques that will help you capture stunning images of insects in their natural habitat.
Preparing for Insect Macro Photography
1. Choosing the Right Time of Day for Insect Photography
Understanding insect behavior is crucial to improving your chances of getting that perfect shot. Insects are cold-blooded creatures, meaning their activity levels are influenced by temperature. They tend to be more sluggish in cooler temperatures, such as during the early morning or late evening, making these times ideal for photography.
Morning and Evening Light: The soft, diffused light at these times, also known as “golden hour,” is much more flattering than the harsh, direct sunlight of midday. This natural light creates gentle shadows and highlights, adding depth to your images without the need for additional lighting.
Capturing Dew on Insects: Another advantage of shooting in the early morning is the presence of dew, which can add a magical touch to your images. Dew-covered insects not only look ethereal, but the water droplets can also highlight textures and patterns on their bodies that might otherwise go unnoticed.
2. Understanding Insect Behavior
Before you head out to photograph, it’s beneficial to spend time learning about the species you plan to shoot. This knowledge will help you anticipate their movements, locate them more easily, and approach them without startling them.
Know Your Subjects: For example, butterflies tend to perch on flowers to feed, dragonflies are often found near water, and ants will likely be traveling along well-worn trails back to their nests. By understanding their habitats, feeding patterns, and typical behaviors, you can position yourself for the best shots.
Predicting Movements: Certain insects, like bees and butterflies, may hover over flowers before landing. Observing these flight patterns gives you an idea of when and where to aim your camera, allowing you to capture them mid-flight or just as they land.
3. Choosing the Right Location
While insects are found almost everywhere, selecting the right environment can make a big difference in the quality of your shots. Look for places with a wide variety of plants, flowers, and water sources, as these areas tend to attract a diverse range of insects.
Gardens and Parks: Flower gardens, whether in parks or in your own backyard, are excellent locations for insect photography. These areas are typically well-maintained and provide plenty of floral subjects for insects like bees, butterflies, and beetles.
Wildfields and Wetlands: For more natural settings, wildflower fields or wetlands offer a variety of insect species, from dragonflies to grasshoppers. Wetlands, in particular, are hotspots for damselflies and dragonflies, which are incredibly captivating to shoot.
Essential Gear for Insect Macro Photography
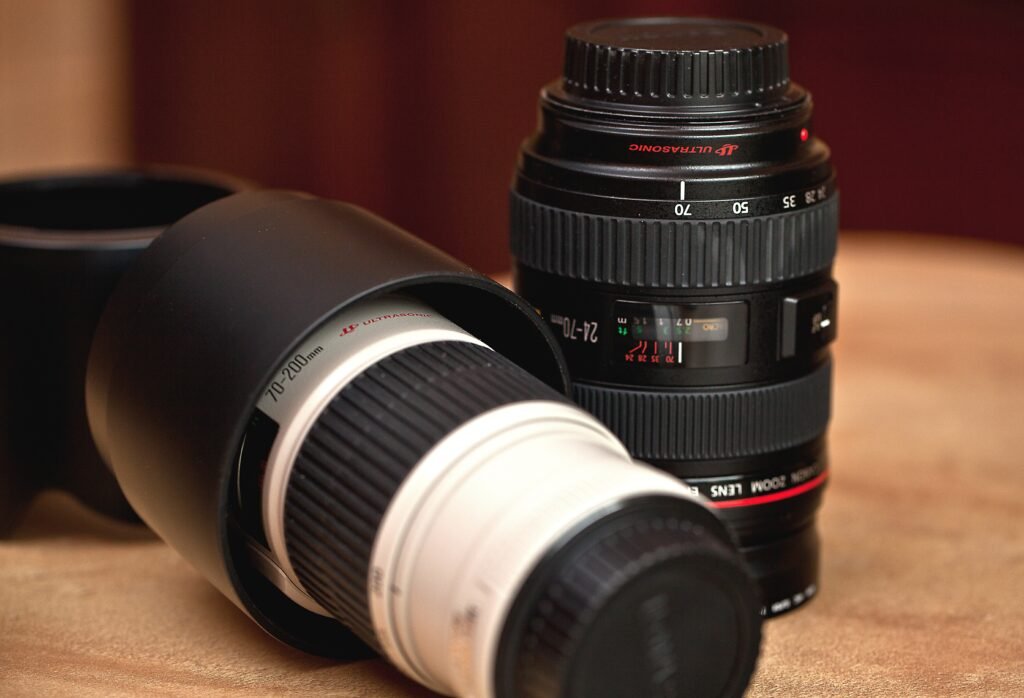
1. Macro Lenses for Insect Photography
A macro lens is indispensable for insect photography, as it allows you to get up close and capture fine details at a high level of magnification. The most commonly used macro lenses offer a 1:1 magnification ratio, which means that the subject will appear life-size on the camera sensor.
Focal Length Considerations: A longer focal length (e.g., 90mm to 105mm) is ideal for insect photography, as it allows you to keep a comfortable distance from your subject. This is particularly important when photographing skittish insects like butterflies or bees, which might fly away if you get too close. Longer lenses also help create a beautiful background blur (bokeh), isolating the subject and making it stand out.Shorter focal length macro lenses (e.g., 50mm or 60mm) can also be used, but these require you to be physically closer to your subject, which may disturb the insect or cast shadows on it.
Image Stabilization: Many macro lenses now come with built-in image stabilization (IS), which can be extremely useful when shooting handheld. Given the shallow depth of field inherent in macro photography, any slight movement can lead to blur. IS helps mitigate this, especially in lower light conditions.
2. Extension Tubes for Macro Photography
If a dedicated macro lens is out of your budget, extension tubes are a more affordable option that can help you achieve closer focusing distances with your existing lenses.
How They Work: Extension tubes fit between your camera body and the lens, moving the lens further from the camera sensor. This increases the magnification of the subject by reducing the minimum focusing distance.
Benefits and Limitations: While extension tubes are a great way to start photographing insects without the expense of a macro lens, they do have some limitations. For example, they can reduce the amount of light entering the lens, so you may need to compensate by increasing your ISO or using additional lighting.
3. Tripods for Macro Photography
A sturdy tripod is one of the most useful tools for insect macro photography, especially when working with shallow depth of field at close distances. A tripod allows you to carefully compose your shot and focus precisely without worrying about camera shake.
Flexibility in Positioning: Look for a tripod with adjustable legs that can spread wide or get close to the ground, as many insect shots will require you to shoot from low angles.
Monopods for Mobility: If you’re working in environments where you need to move quickly, like a windy field or a garden with active insects, a monopod may offer more flexibility while still providing some stability.
4. Lighting for Insect Macro Photography
Natural light is often sufficient for insect photography, but in some cases, additional light sources are needed to enhance the subject’s details and bring out its texture and colors.
Ring Flashes: A ring flash is a popular choice for macro photographers because it provides even lighting and reduces harsh shadows. The light surrounds the lens, ensuring that the subject is illuminated from all angles, making it ideal for detailed insect photography.
Off-Camera Flash with Diffusers: Another option is using an off-camera flash with a diffuser. This provides more control over the direction of the light, and the diffuser helps soften the harshness of the flash, preventing blown-out highlights on reflective surfaces like insect wings.
Techniques for Photographing Insects Up Close
1. Patience: The Golden Rule in Insect Photography
Insect photography often tests your patience. Unlike static subjects, insects are unpredictable and may not always cooperate. To successfully photograph insects, you need to observe, wait, and react swiftly when the opportunity arises.
Observing Behavior: Spend some time watching the insect before you start shooting. Understanding how it interacts with its environment, how it moves, and what it tends to do can give you valuable insight into when and how to capture your shot. For instance, some bees return to the same flower multiple times, giving you chances to reposition yourself for the perfect angle.
Timing Your Shots: Insects may remain still only for a brief moment. By anticipating their movements, you can time your shots perfectly. Use burst mode to increase the chances of capturing that fleeting moment when everything aligns.
2. Approaching Insects Slowly and Carefully
Insect photography requires stealth. Insects are easily startled by movement or noise, so approaching them with caution is critical.
Move Gradually: Avoid sudden movements that could scare the insect away. Move your camera and body incrementally, and avoid casting your shadow on the insect. A slow, deliberate approach will give you a better chance of capturing your subject without it flying or crawling off.
Minimize Vibration: Even the slightest vibration can disturb an insect. When shooting handheld, consider stabilizing your body by resting your elbows on your knees or on the ground. Alternatively, use a tripod for maximum stability.
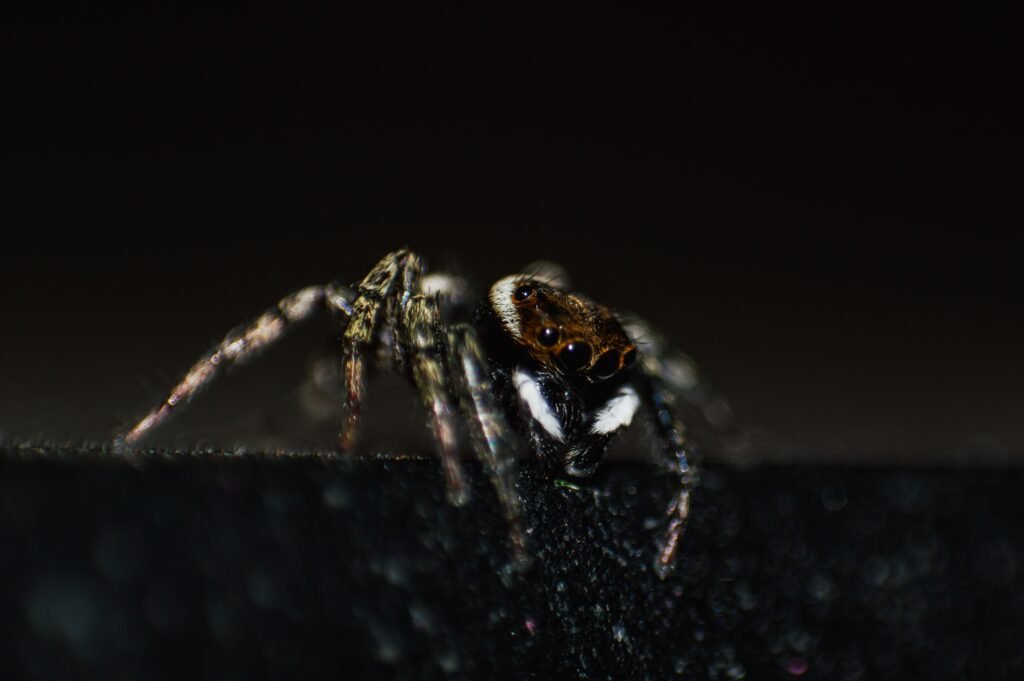
3. Focusing on the Eyes
When photographing insects, focusing on their eyes is essential. Sharp, well-focused eyes can make an image look incredibly engaging and professional. Many insects have compound eyes, which consist of thousands of tiny lenses, creating an almost mosaic-like effect. Capturing the intricate details of these eyes can elevate your image significantly.
Eye-Level Shooting: Whenever possible, try to position yourself at eye level with the insect. This perspective draws the viewer into the scene and creates a more intimate connection with the subject.
Manual Focus for Precision: Autofocus can struggle in macro photography, especially when you’re working with shallow depth of field. Switching to manual focus allows you to fine-tune the sharpness and ensure that the eyes are tack-sharp.
4. Depth of Field in Macro Insect Photography
In macro photography, depth of field (DOF) becomes extremely shallow, making it challenging to keep the entire insect in focus. Controlling your DOF is essential for ensuring your subject is sharp while also achieving the desired background blur.
Smaller Aperture for Greater DOF: To increase your depth of field and get more of the insect in focus, use a smaller aperture (higher f-stop number). An aperture setting between f/8 and f/16 is typically ideal for insect macro photography, as it strikes a balance between sharpness and the amount of light entering the lens.
Balancing Exposure: Keep in mind that a smaller aperture allows less light into the camera, so you may need to compensate by increasing your ISO or slowing down your shutter speed. However, slowing the shutter too much could lead to motion blur, especially if the insect moves or if you’re shooting handheld.
Best Practices for Macro Insect Photography
1. Capturing Different Angles and Perspectives
Don’t limit yourself to shooting insects from just one angle. Experimenting with different perspectives can help you discover more visually compelling compositions and highlight different aspects of the insect.
Top-Down vs. Side-Profile: A top-down perspective is a classic choice for showcasing the full body of the insect, especially when photographing beetles, ants, or butterflies resting on flowers. On the other hand, a side-profile view can emphasize the insect’s features like its wings or antennae.
Low-Angle Shots: Shooting from a low angle—at the insect’s level—can create a more dramatic and engaging image. It allows the viewer to experience the world from the insect’s perspective and often brings out the details in the insect’s face and body that wouldn’t be as apparent from above.
2. Using Burst Mode for Moving Subjects
Insects often move unpredictably, and trying to capture them in motion can be tricky. Using your camera’s burst mode allows you to take multiple frames per second, giving you more opportunities to get the perfect shot.
Freezing Action: Whether you’re photographing a bee in flight or a butterfly landing on a flower, burst mode increases your chances of freezing the action at just the right moment. Review the shots afterward to find the frame where the insect’s wings or body are in the best position.
3. Mastering the Background
The background of your image is just as important as the insect itself. A cluttered or distracting background can take attention away from your subject, so it’s crucial to control the background as much as possible.
Creating a Blurred Background: To isolate the insect and make it stand out, use a wide aperture (lower f-stop number) to create a shallow depth of field. This will blur the background, leaving the insect in sharp focus while softening any distracting elements.
Complementary Colors: Pay attention to the colors in the background. A complementary color scheme can make the insect pop. For example, a vibrant green leaf behind a bright orange butterfly creates a pleasing contrast, drawing the viewer’s eye directly to the subject.
4. Using Focus Stacking for Detailed Insect Shots
Focus stacking is a powerful technique for macro photographers, especially when dealing with insects that have multiple layers of fine details, such as large wings or long antennae.
What is Focus Stacking?: Focus stacking involves taking multiple shots of the same subject, each with a slightly different focus point. Later, these images are combined in post-processing to create a single image with a greater depth of field.For instance, you might take one photo where the insect’s eyes are in focus, another where its wings are sharp, and a third that captures its legs or antennae. When stacked together, the final image will appear sharp from front to back.
Software for Focus Stacking: Many popular editing programs, such as Adobe Photoshop or Helicon Focus, allow you to merge these images seamlessly, creating a final result with stunning clarity and sharpness.
Overcoming Common Challenges in Insect Macro Photography
1. Dealing with Wind
Wind is a major challenge in outdoor insect photography. Even a slight breeze can cause the leaves, flowers, or grasses where your insect is perched to sway, resulting in blurred images.
Using a Wind Block: You can minimize the effect of wind by creating a wind block with your body, hands, or an artificial barrier like a piece of cardboard or a portable diffuser.
Shooting in Calm Conditions: Alternatively, aim to shoot in the early morning when the air is often still. Mornings not only offer calmer conditions but also tend to coincide with lower temperatures when insects are less active, giving you more time to compose your shots.
2. Minimizing Camera Shake
When shooting at high magnifications, even the slightest movement of the camera can cause blur. Stabilizing your camera is crucial for sharp insect macro photography.
Using a Tripod: Whenever possible, use a tripod for maximum stability, especially when working with slower shutter speeds or narrow apertures. A tripod allows you to carefully compose your shot and focus precisely on the insect’s most important features, such as its eyes or wings.
Remote Shutter Release: To further reduce the chances of camera shake, use a remote shutter release or your camera’s self-timer function. This eliminates the risk of accidentally moving the camera when you press the shutter button.
3. Getting Close Without Disturbing the Insect
One of the most significant challenges in insect macro photography is getting close enough to capture fine details without disturbing your subject.
Using a Longer Focal Length: A longer focal length macro lens, such as a 100mm or 105mm, allows you to maintain some distance from the insect while still achieving the level of magnification needed for detailed close-ups. This reduces the likelihood of startling the insect and makes it easier to photograph natural behavior.
Moving Slowly and Quietly: Approach the insect gradually, avoiding any sudden movements. Try to position yourself so that your shadow doesn’t fall on the insect, as this can cause it to fly or crawl away. By moving calmly and deliberately, you’re more likely to get the shot you want.
Final Thoughts
Insect macro photography is a captivating and rewarding form of photography that challenges your technical skills and patience while offering an opportunity to explore the delicate beauty of the natural world. By mastering techniques such as careful focus, controlling depth of field, and experimenting with lighting, you can capture stunning images of insects that reveal details not visible to the naked eye.
With the right gear, a bit of research on your subjects, and the willingness to experiment, you can create compelling macro images that truly stand out.