Physical Address
304 North Cardinal St.
Dorchester Center, MA 02124
Physical Address
304 North Cardinal St.
Dorchester Center, MA 02124
In this guide, we’ll explore how to use extension tubes for macro photography, their benefits, and tips for achieving the best results when working with these versatile accessories.
Macro photography is a fascinating way to explore the intricate details of small subjects like insects, flowers, or everyday objects. While dedicated macro lenses are the most popular tools for this genre, they can be expensive. Fortunately, extension tubes provide a budget-friendly alternative for achieving close-up magnification with your existing lenses.

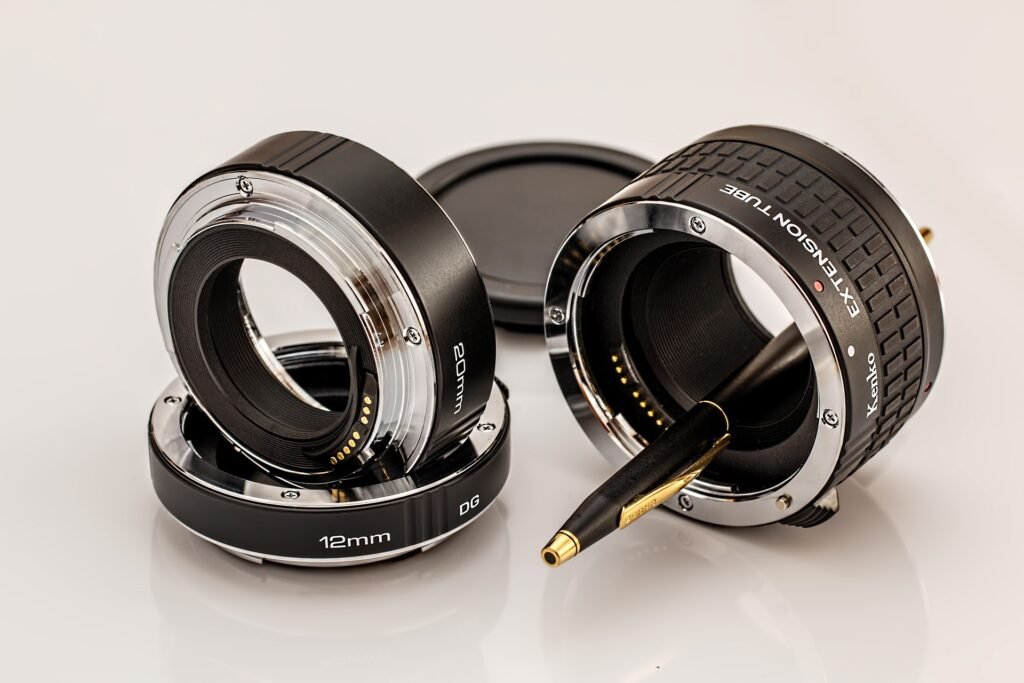
Extension tubes are simple, hollow cylindrical tubes that fit between your camera body and lens. They increase the distance between the lens and the camera’s sensor, allowing you to focus much closer to the subject than your lens would normally allow. By doing this, they increase the magnification and enable you to capture intricate details, perfect for macro photography.
Importantly, extension tubes do not contain any optical elements. This means they won’t degrade the quality of your lens or introduce distortion, unlike some other accessories such as close-up filters.
The basic principle behind extension tubes is simple: the farther a lens is from the sensor, the closer it can focus. The closer your lens can focus, the greater the level of magnification you can achieve. When using extension tubes, your lens moves away from its normal focusing distance, allowing you to capture macro-level shots even with non-macro lenses.
Here’s how the mechanics work:
Extension tubes are available in different lengths (typically ranging from 12mm to 36mm). You can stack multiple tubes together for even more extension, although this can reduce light transmission and make focusing trickier.
Extension tubes offer several advantages that make them a popular tool among macro photographers:
Macro lenses can be a significant investment, often costing hundreds or thousands of dollars. Extension tubes are much more affordable, offering a simple solution for photographers who want to try macro photography without committing to a dedicated macro lens. This makes them perfect for beginners or hobbyists.
One of the main benefits of extension tubes is their versatility. They can be used with a wide variety of lenses, including standard kit lenses, prime lenses, and telephoto lenses. This flexibility allows you to explore macro photography without needing to purchase a specialized lens.
For example, you could attach a 50mm prime lens or even a zoom lens to your camera with extension tubes and immediately start capturing macro shots.
Unlike other macro accessories such as close-up filters, extension tubes do not contain any glass elements, so they don’t affect the optical quality of your lens. Your lens’s sharpness and color rendition remain intact, preserving the quality of your images.
Using extension tubes is a straightforward process, but getting the best results requires an understanding of their quirks and limitations. Follow these steps for an optimal experience:
Extension tubes come in various lengths (typically 12mm, 20mm, 36mm), with longer tubes providing higher magnification. You can use a single tube or stack them to achieve more extension, but be aware that stacking will also decrease the amount of light reaching the sensor, making the viewfinder darker and potentially slowing down autofocus.
Start by using a shorter tube (12mm or 20mm) to maintain easier control and increase magnification incrementally. As you get more comfortable, you can add longer tubes or stack them for more dramatic close-ups.
To use an extension tube:
Once connected, your lens will now be farther from the sensor, allowing for close-up focusing.
When using extension tubes, autofocus may become less reliable, especially with longer tubes. It’s often best to switch to manual focus for greater precision. Use live view or focus magnification (if your camera supports it) to carefully adjust focus on the critical part of your subject.
To achieve the best results:
Because the depth of field becomes very shallow when using extension tubes, you’ll need to be careful with your aperture settings. Stopping down your aperture (e.g., f/8 or f/11) will help increase the area in focus, although it will also require more light or longer exposure times.
Keep in mind that the farther your lens is extended, the less light it can gather, so you may need to adjust your camera’s settings:
Due to the extreme close-ups achieved with extension tubes, even the slightest movement can result in blurry images. Using a tripod is highly recommended to ensure stability. A tripod will allow you to fine-tune your composition and focus without worrying about camera shake.
For extra stability, consider using a remote shutter release or your camera’s self-timer to avoid moving the camera when pressing the shutter button.
As mentioned earlier, the extension tubes reduce the amount of light reaching your sensor, so adequate lighting is essential. Shooting in bright daylight can help, but if natural light is insufficient, consider adding:
When shooting at high magnifications, the shallow depth of field can be both a challenge and an opportunity. Always ensure that the most critical part of your subject (such as an insect’s eyes or the center of a flower) is in sharp focus. Use manual focus and take the time to fine-tune your shot.
Using extension tubes for macro photography is a great way to dive into the world of close-up photography without breaking the bank. They offer a flexible and cost-effective method of increasing magnification with your existing lenses while maintaining image quality.
By choosing the right tube length, controlling your focus and lighting, and stabilizing your camera, you can capture detailed, beautiful macro images. Whether you’re shooting nature, small objects, or intricate textures, extension tubes allow you to explore the tiny world of macro photography with greater creativity and control.